One install command and a bot token: setting up OpenClaw 2.0 when you have never run an agent before
A verified, step-by-step OpenClaw 2.0 setup guide for beginners: the Node version you need, the three ways to give the agent a model and what each costs, the exact six-step guided onboarding introduced in v2026.8.1, the four-step Telegram pairing flow, three first tasks worth running, the day-one permission settings that keep the blast radius small, and the five failures new installs actually hit.
The official numbers for installing OpenClaw are unglamorous in the best way. The install script takes 2 to 5 minutes. QuickStart onboarding takes "a few minutes." Then you type openclaw dashboard, a browser tab opens, you send a message, and something answers.
So the setup is not the hard part. The hard part is the week after — deciding what this thing is allowed to touch, what to ask it for, and what to do when it sits there silently and you have no idea why.
This guide is the practical companion to our read on what the 2.0 release actually changed. No analysis here, just the procedure: what to have ready, the exact commands, what the new guided onboarding asks you in order, how to attach it to Telegram, three first tasks that are the right size, the permissions to set on day one, and the five failures that new installs actually hit. Every command below is taken from the official OpenClaw documentation, retrieved September 1, 2026. Where the docs are silent, this guide says so rather than guessing.
TL;DR:
- You need Node.js 22.22.3+, 24.15+, or 25.9+ (Node 26 is recommended) and one source of AI: an existing Claude or ChatGPT sign-in, an API key, or a local model server.
- The beginner path is one line —
curl -fsSL https://openclaw.ai/install.sh | bash— which installs Node if it is missing and launches onboarding for you.- Guided onboarding in 2.0 tries to reuse AI access you already have, and it will not save a model route until a real completion succeeds. That single change removes the most common way old setups failed silently.
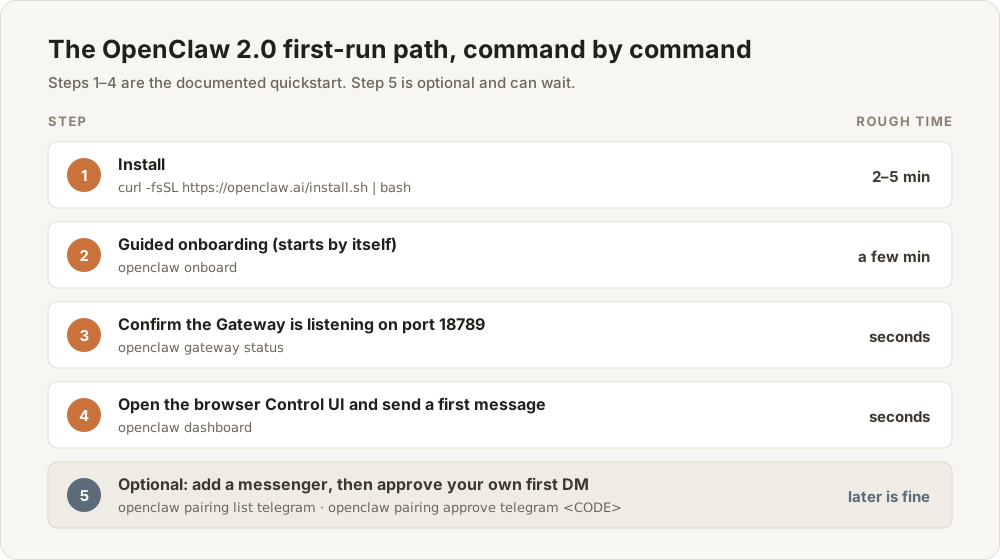
Steps 1 through 4 are the documented quickstart. Source: OpenClaw "Getting started" and "Install", retrieved September 1, 2026.
What you need before you type anything
Three prerequisites, and only one of them requires a decision.
A supported Node.js. OpenClaw's install page lists Node 22.22.3+, 24.15+, or 25.9+, with Node 26 recommended. Check yours with node --version. If Node is missing entirely, the installer provisions it for you — Node 26 on macOS, Node 24 LTS on Linux.
A machine that stays awake. macOS, Linux, or Windows all work. The docs are direct about the trade-off: a laptop is the lowest-friction option and gives the agent direct access to your local files and a visible browser window, but sleep, network drops, and OS updates all interrupt it. A small server is always-on but headless. The documented minimum for a VPS is 1 vCPU, 1 GB RAM, and roughly 500 MB of disk, with 2 GB+ RAM recommended for headroom. A Raspberry Pi 4 with 4 GB works fine, because the Pi only runs the Gateway while the model itself is called over the network.
Start on the laptop you already have. You can move the whole thing later by copying two directories, and the docs cover that migration.
A source of AI. This is the decision. OpenClaw does not ship a model; it connects to one.
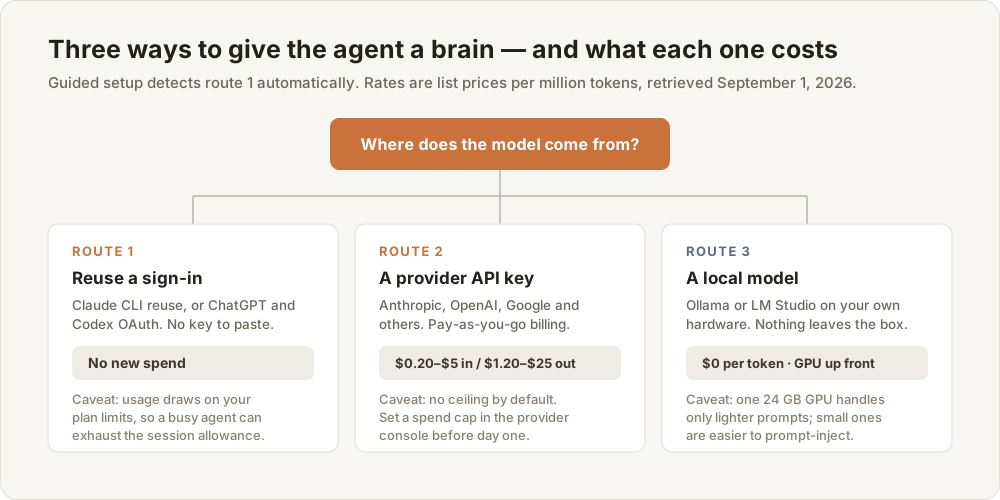
Guided setup detects route 1 automatically. Rates are provider list prices, retrieved September 1, 2026.
| Model source | What it costs | Best for | The catch |
|---|---|---|---|
| Existing Claude subscription (Pro, Max, Team, Enterprise) | No new spend | Someone who already pays Anthropic monthly | OpenClaw reuses your Claude CLI login. Anthropic currently treats that path as subscription-plan usage against your plan's limits, not a separate allowance — a chatty agent can eat your session budget |
| Existing ChatGPT or Codex subscription | No new spend | Someone already on a ChatGPT plan | Fully supported via Codex OAuth, and onboarding can run the flow for you. OpenAI explicitly permits subscription OAuth in external tools like OpenClaw |
| A provider API key | Pay per token | Anyone who wants predictable, uncapped-but-metered billing | List prices span a wide range: Claude Sonnet 5 is $2 per million input tokens and $10 per million output; Claude Opus 5 is $5 and $25; OpenAI's gpt-5.6-luna is $0.20 and $1.20 |
| A local model (Ollama, LM Studio) | $0 per token | Data that must never leave your hardware | The hardware floor is real. OpenClaw's own local-models page says a single 24 GB GPU handles "only lighter prompts at higher latency," and warns that small or heavily quantized models are more vulnerable to prompt injection |
Put an actual number on the API-key row, because "pay per token" is uselessly vague when you are deciding. Take thirty exchanges a day, each sending roughly 8,000 tokens of context and getting back 700. That is 240,000 input and 21,000 output tokens daily. On Claude Sonnet 5's list rates that is about $0.69 a day, near $21 a month. On gpt-5.6-luna it is about $0.07 a day, near $2.20 a month. Those are arithmetic on published list prices, not a measured bill — your context will be bigger than you think and caching will claw some of it back — but they establish the order of magnitude, which is dollars, not hundreds of dollars.
Our recommendation for a first install: use the subscription you already pay for if you have one, because guided setup finds it without you pasting anything. Otherwise take an API key from any provider and set a hard spend cap in that provider's console before you run onboarding. Leave local models for later; they are a legitimate destination but a poor starting line.
Install: one command, and the two alternatives worth knowing
The documented beginner path is the installer script. It detects your OS, installs Node if needed, installs OpenClaw, and launches onboarding — one command instead of four decisions.
On macOS, Linux, or WSL2:
curl -fsSL https://openclaw.ai/install.sh | bash
On Windows PowerShell:
iwr -useb https://openclaw.ai/install.ps1 | iex
That is the whole install. Two alternatives are worth knowing about even if you do not use them today.
Desktop apps, if a terminal is not where you want to live. Windows has a signed Hub installer you run like any other Windows app; macOS has a menu bar app distributed as a .dmg on the project's GitHub releases. Both can provision a local Gateway during first-run setup.
npm, if you already manage Node yourself. On npm 12 or npm 11.16+:
npm install -g openclaw@latest --allow-scripts=openclaw
openclaw onboard --install-daemon
The --allow-scripts=openclaw flag matters: npm 12 blocks unapproved lifecycle scripts by default, and without it npm reports OpenClaw's preinstall and postinstall steps as "blocked because they are not covered by allowScripts." On npm 11.15 and earlier, run the same command without the flag. Docker, Podman, Nix, and a from-source pnpm build are all documented too, and all of them are the wrong choice for your first hour.
What the 2.0 guided onboarding asks you, in order
This is where v2026.8.1 changed the beginner experience most, so it is worth knowing what is coming before it appears. Plain openclaw onboard — which the installer starts for you — now follows a six-step guided path:
- Accept the security notice. Read it. It states the trust model you are opting into, which the last section of this guide unpacks in plain words.
- Detection runs, read-only. OpenClaw looks for models you already have configured, API-key environment variables, supported local AI CLIs, and tool-capable models already installed on any reachable Ollama or LM Studio server. This pass never downloads a model. Note two documented exclusions: Gemini CLI and Antigravity are not offered as detected setup routes, and Pi and OpenCode installs may be reported for context without being usable as an inference route.
- The first candidate gets tested with a real completion. If it fails, onboarding shows you why and moves to the next candidate rather than saving a broken route.
- If detection finds nothing, you pick a provider. The first menu offers OpenAI, Anthropic, xAI (Grok), Google, or OpenRouter, with More… for the rest and Custom Provider for an unlisted endpoint. A second menu shows that provider's regions, plans, and supported auth methods — browser, device, API key, or token. Every route gets the same real-completion test. Skip for now exits without going further.
- Only the verified route is saved, plus whatever credential or plugin state it needs. Your workspace and Gateway settings are left untouched at this stage.
- The setup assistant starts with that verified model and configures the rest by conversation — workspace, Gateway, channels, agents, plugins.
Then verify the result yourself:
openclaw gateway status     # should show the Gateway listening on port 18789
openclaw dashboard          # opens the Control UI in your browser
Type a message in the Control UI chat. A reply means every layer works.
Here is the point, and it is the single most useful thing to understand about 2.0: the guided flow refuses to save a model route it has not proven works. Re-running openclaw onboard on an already-configured install therefore doubles as a repair pass — it tests the current default model first, and a failing check never silently swaps your model, it stops and asks.
Two things guided onboarding deliberately does not do. It does not handle remote Gateway setup, channel pairing wizards, daemon controls, skills, or imports — those live in the classic wizard at openclaw onboard --classic. And to change your model provider or its authentication later, you exit the assistant and run openclaw onboard again; the conversational assistant does not open provider flows.
Connect Telegram: four steps and one number you have to find
The docs name Telegram as the fastest channel to set up, because it needs nothing but a bot token. Its DM policy defaults to pairing, which is the safe default and the reason step 3 exists.
-
Create the bot. In Telegram, message @BotFather — confirm the handle is exactly that — and run
/newbot. Follow the prompts and save the token it gives you. There is also a web flow at BotFather's web app if you prefer a UI. -
Put the token in your config at
~/.openclaw/openclaw.json:
{
  channels: {
    telegram: {
      enabled: true,
      botToken: "123:abc",
      dmPolicy: "pairing",
      groups: { "*": { requireMention: true } },
    },
  },
}
The environment variable TELEGRAM_BOT_TOKEN works as a fallback for the default account only. Telegram does not use openclaw channels login telegram — set the token in config or env, then start the Gateway.
- Start the Gateway, DM your bot, and approve yourself:
openclaw gateway
openclaw pairing list telegram
openclaw pairing approve telegram <CODE>
Pairing codes expire after 1 hour. If yours has gone stale, message the bot again for a fresh one.
- Find your numeric Telegram user ID and pin it down. Pairing approval grants DM access only; it is not blanket authorization. The privacy-preserving method from the docs: DM your bot, run
openclaw logs --follow, and readfrom.idfrom the log line. The official Bot API method iscurl "https://api.telegram.org/bot<bot_token>/getUpdates"and readingmessage.from.id. Third-party ID bots exist and are less private. Once you have the number, the docs' recommendation for a one-owner bot isdmPolicy: "allowlist"with your numeric ID inchannels.telegram.allowFrom, rather than relying on a past pairing approval.
Groups are a separate decision with a separate gotcha. Telegram bots default to Privacy Mode, which limits which group messages they receive at all. To see everything, either disable privacy mode with BotFather's /setprivacy or make the bot a group admin — and after toggling it, remove and re-add the bot in each group so Telegram applies the change. Skip groups entirely on day one.
Discord, Signal, WhatsApp, Slack, iMessage, Matrix, Microsoft Teams and roughly two dozen others are supported, each with its own page. None of them is as fast to stand up as a bot token.
Your first three tasks, sized for a first week
Agents are good at fetching, summarizing, watching, and reminding. They are unreliable at anything where being wrong is expensive and nobody checks. Pick first tasks where a wrong answer costs you five seconds of annoyance.
Task one: a one-shot reminder. It proves the scheduler, the model, and your delivery route all work together, and it deletes itself afterwards.
openclaw automations create "2026-09-08T09:00:00Z" \
  --name "Reminder" \
  --session main \
  --system-event "Reminder: review the OpenClaw permissions I set on day one" \
  --wake now \
  --delete-after-run
Task two: a recurring morning brief. The schedule field takes a standard cron expression, and the prompt is the second positional argument.
openclaw automations create "0 7 * * *" \
  "Summarize what changed in my workspace notes since yesterday." \
  --name "Morning brief"
Then inspect what you built, because reading the run history is how you learn what the agent actually did:
openclaw automations list
openclaw automations runs --id <job-id>
Two properties of automations are worth internalizing now. They run inside the Gateway process, which means schedules only fire while the Gateway is running — a closed laptop is a stopped scheduler. And every run creates a background task record, so openclaw tasks list and openclaw tasks audit give you an audit trail rather than a mystery.
Task three: something read-only over your own material. Point the agent at its workspace and ask it to summarize, find, or compare. No writes, no email, no calendar, no shell. You are calibrating: after a week of this you will know, concretely, which requests it nails and which ones it answers confidently and wrongly. That calibration is the actual deliverable of week one — not the automations.
What to hold back: the documented email path, the IMAP trigger, is a genuinely useful pattern, but its own documentation configures it behind a dedicated restricted reader agent with tools.profile: "minimal", a sandbox with workspaceAccess: "none", a sender allowlist, and DMARC-based sender authentication. That is the correct amount of paranoia for letting strangers' text reach a model, and it is not a day-one project.
The day-one perimeter: decide what it can reach before you decide what it can do
OpenClaw's security page opens by stating that it ships conservative defaults — the Gateway binds to loopback, most channels answer an unknown DM with a pairing code instead of processing it, and group access is allowlisted behind a mention gate. Your job on day one is mostly to not undo that.
The trust model, in plain words. One gateway equals one trust boundary. Everyone who can message a tool-enabled agent shares that agent's tool authority — that is fine for you, fine for teammates who already trust each other, and explicitly not supported for mutually adversarial users sharing an agent. Anyone who can edit files under ~/.openclaw is a trusted operator by definition. If you need to serve people who do not trust each other, the documented answer is separate gateways, ideally separate OS users or hosts, not clever configuration.
One command tells you whether you have drifted:
openclaw security audit
openclaw security audit --fix    # applies only narrow, safe remediations
The audit's own triage order is a good beginner priority list: anything "open" combined with enabled tools comes first, then public network exposure, then browser-control exposure, then file permissions, then plugins, then model choice.
What not to connect in week one. Do not set any dmPolicy to "open" — that lets any Telegram account which finds or guesses your bot username command it. Do not expose the Gateway beyond loopback, and do not enable Tailscale Funnel. Do not enable tools.elevated, which is the escape hatch that runs shell commands outside the sandbox. Do not install plugins you have not read. And prefer the strongest current-generation model you can, because the docs are explicit that weaker and over-quantized models are easier to prompt-inject — which matters the moment an agent with tools reads text written by someone else.
Start read-only where you can. A documented read-only profile combines a sandbox with workspaceAccess: "ro" and a tool deny list:
{
  agents: {
    entries: {
      family: {
        default: true,
        workspace: "~/.openclaw/workspace-family",
        sandbox: { mode: "all", scope: "agent", workspaceAccess: "ro" },
        tools: {
          allow: ["read"],
          deny: ["write", "edit", "apply_patch", "exec", "process", "browser"],
        },
      },
    },
  },
}
How to stop it. Know these before you need them, not after.
openclaw gateway stop        # stop the managed service
openclaw gateway restart     # restart it (do not chain stop + start instead)
openclaw backup create       # snapshot before anything destructive
openclaw uninstall --dry-run # see exactly what removal would delete
openclaw gateway stop requires --force in a non-interactive shell. On macOS it removes the LaunchAgent from the current boot session; pass --disable if you want the stop to survive a reboot. And the containment order from the incident-response section, should something genuinely go wrong: stop the process, set gateway.bind: "loopback", then switch risky DMs to dmPolicy: "disabled" and delete every "*" allow-all entry.
The five failures beginners actually hit
openclaw: command not found after a successful install. Almost always a PATH problem — npm's global bin directory is not on your shell's PATH. Diagnose with node -v, npm prefix -g, and echo "$PATH". On Windows, check npm config get prefix, add that directory to your user PATH, and reopen PowerShell.
The installer appears to hang. Re-run it with --verbose for real feedback: curl -fsSL --proto '=https' --tlsv1.2 https://openclaw.ai/install.sh | bash -s -- --verbose. The PowerShell installer has no verbose switch; wrap it in Set-PSDebug -Trace 1 instead.
Onboarding shows the wake-up line and nothing replies, with token count stuck at 0. The agent never ran. Restart the Gateway, then check auth and logs, in this order:
openclaw gateway restart
openclaw status
openclaw models status
openclaw logs --follow
openclaw doctor
If you skipped model setup, onboarding tells you so with a "Model auth missing" note — fix it with openclaw configure --section model.
Telegram startup reports getMe returned 401. That is a Telegram auth failure for your bot token, full stop. Re-copy or regenerate it in BotFather and update channels.telegram.botToken. A deleteWebhook 401 Unauthorized during startup is the same bad token surfacing at a different call.
The bot ignores group messages. Check three things in order: whether privacy mode is still on (BotFather /setprivacy, then remove and re-add the bot), whether the group is actually listed under channels.telegram.groups, and what openclaw logs --follow gives as the skip reason. Negative supergroup IDs beginning with -100 belong under groups, not under groupAllowFrom — a genuinely common mix-up.
When none of that helps, one command turns your install's state into a diagnosis: openclaw triage runs read-only health checks, writes a sanitized prompt describing what it found, and offers to hand that prompt to a coding agent on your machine. Nothing leaves your machine until you pick one, and secrets, tokens, raw chat payloads, and raw logs are excluded from the prompt.
Where to go next
The docs are the destination, and they are unusually navigable: append .md to any page URL for clean Markdown, and docs.openclaw.ai/llms.txt is a complete index of every page with a one-line description. The pages worth bookmarking on day one are Getting started, Channels, Security, and Automations. openclaw docs searches the live index from your terminal.
One honest limit before you go. Agents make mistakes, and an agent with tools makes mistakes that touch things. OpenClaw's own documentation says the plain part out loud: text returned by search, fetch, MCP, plugins, and the browser is bounded, normalized, and explicitly marked as untrusted before the model sees it — and even then, "the model can still be influenced by hostile material it reads." Build the habit of granting the narrowest permission that makes a task possible, and let the perimeter widen only when a specific task forces it.
The bottom line: setup is eight minutes, judgment is the rest of the week
The install genuinely is one command. The onboarding genuinely does find the subscription you already pay for. What no installer can do for you is decide what an autonomous process should be allowed to reach on your behalf — and that decision, not the setup, is what separates people who get real work out of an agent from people who quietly stop opening it after two weeks.
Start with a read-only agent that can only annoy you. Widen the perimeter one permission at a time, each time because a specific task demanded it. That is a slower first week and a much better second month.
What would you actually trust a program to do while you were not watching?
Where Telli.sh fits: an agent handles the tasks you hand it; Telli.sh keeps the record of the conversations you have with people. It runs real-time transcription, speaker separation, and AI summaries on your meetings, with translation into 44 target languages and an interface in 15 — so the decisions made in a call end up as a searchable note instead of a memory. If your agent is going to act on what the team agreed, something has to have written the agreement down accurately first.
Sources
- OpenClaw — Getting started — Node 22.22.3+/24.15+/25.9+ requirement, the installer commands,
openclaw gateway statuson port 18789,openclaw dashboard, andopenclaw triage; retrieved September 1, 2026 - OpenClaw — Install — system requirements, desktop app downloads, the npm/pnpm/bun paths and the
--allow-scripts=openclawnpm 12 policy, and the PATH troubleshooting commands; retrieved September 1, 2026 - OpenClaw — Onboarding (CLI) — the six-step guided default, the real-completion verification gate, the provider menus, the Gemini CLI and Antigravity exclusion, and what
--classicstill covers; retrieved September 1, 2026 - OpenClaw — v2026.8.1 (AKA OpenClaw 2.0) release notes — guided onboarding as the local custodian flow, browser-first handoff after setup, and the untrusted-external-content marking for tool output; retrieved September 1, 2026
- OpenClaw — Telegram — BotFather
/newbot, the config block,openclaw pairing list/approve, the 1-hour code expiry, privacy mode and the remove-and-re-add requirement, the-100supergroup ID rule, and thegetMe returned 401signature; retrieved September 1, 2026 - OpenClaw — Security — conservative defaults, the one-trust-boundary-per-gateway model,
openclaw security auditand its triage order, the read-only agent profile, and the incident containment sequence; retrieved September 1, 2026 - OpenClaw — FAQ: first-run setup — the 2–5 minute install estimate, Claude CLI reuse and its plan-limit billing caveat, Codex OAuth support, the wake-up-with-no-reply recovery sequence, VPS minimums, and the laptop-versus-server trade-off; retrieved September 1, 2026
- OpenClaw — FAQ: models and auth — the strongest-model recommendation for tool-enabled agents and the Ollama setup path; retrieved September 1, 2026
- OpenClaw — Automations and
openclaw automations— the one-shot and croncreatesyntax, in-Gateway execution, and run history; retrieved September 1, 2026 - OpenClaw — Local models — the 24 GB single-GPU limitation and the prompt-injection warning on quantized checkpoints; retrieved September 1, 2026
- OpenClaw —
openclaw gatewayandopenclaw uninstall— stop/restart semantics, the--forcerequirement in non-interactive shells, and--dry-runremoval; retrieved September 1, 2026 - Anthropic — Model pricing — Claude Sonnet 5 at $2/$10 per million tokens and Claude Opus 5 at $5/$25; retrieved September 1, 2026
- OpenAI — API pricing — gpt-5.6-luna at $0.20 input and $1.20 output per million tokens; retrieved September 1, 2026
- Our companion piece on what the OpenClaw 2.0 release actually changed